Thursday, December 29, 2011

Progress but not nearly finished.

Front Elevation
With the doors open from the front
closeup of roof
Closeup of Porch - I got my own goat!
Entry Way/Formal Parlor

Kitchen

Dining Room


Family Parlor/Lounging Room

Bathroom

Bedroom - working on linens


Music Room in progress


Maid's Room - She needs a bed!

Work Room/Laundry/Sewing/Ironing

Monday, November 28, 2011

New Goodies

New Porch Furniture

My Birthday Present from Jeff - New parlor stove!!

Thursday, November 24, 2011

Things are shaping up!!

Latest exterior work. I need to decide on trim and I'm waiting for my roofing material to come in
....

Inside the large doors...

Loving those shingles on the front peak. What color to paint them? Undecided yet...

The "Music Room"

The "Help"'s room...Need to get that piano out of there...

Attic storage room....that accounts for the bare bulb...

Wednesday, November 16, 2011

So many tiny steps...

I'm still working on my Katherine Project. I just had a birthday, so my "present" preference was yet another trip to the dollhouse store. I needed some more hardwood and tile flooring, some additional wallpaper, a dining room set, etc.  It takes so much to build a house! I was pleasantly surprised when asking the shop owner if she had a "Bodo Hennig" parlor stove in stock, that she handed me a bag. My son had called earlier and purchased the stove for me! Of course, there was confusion and she had sold him the cook stove instead of the parlor stove, but I should have the correct one within 2 weeks.
The "I Need" list is never ending. What I NEED to do is catalogue everything I have bought thus far.... maybe tomorrow...
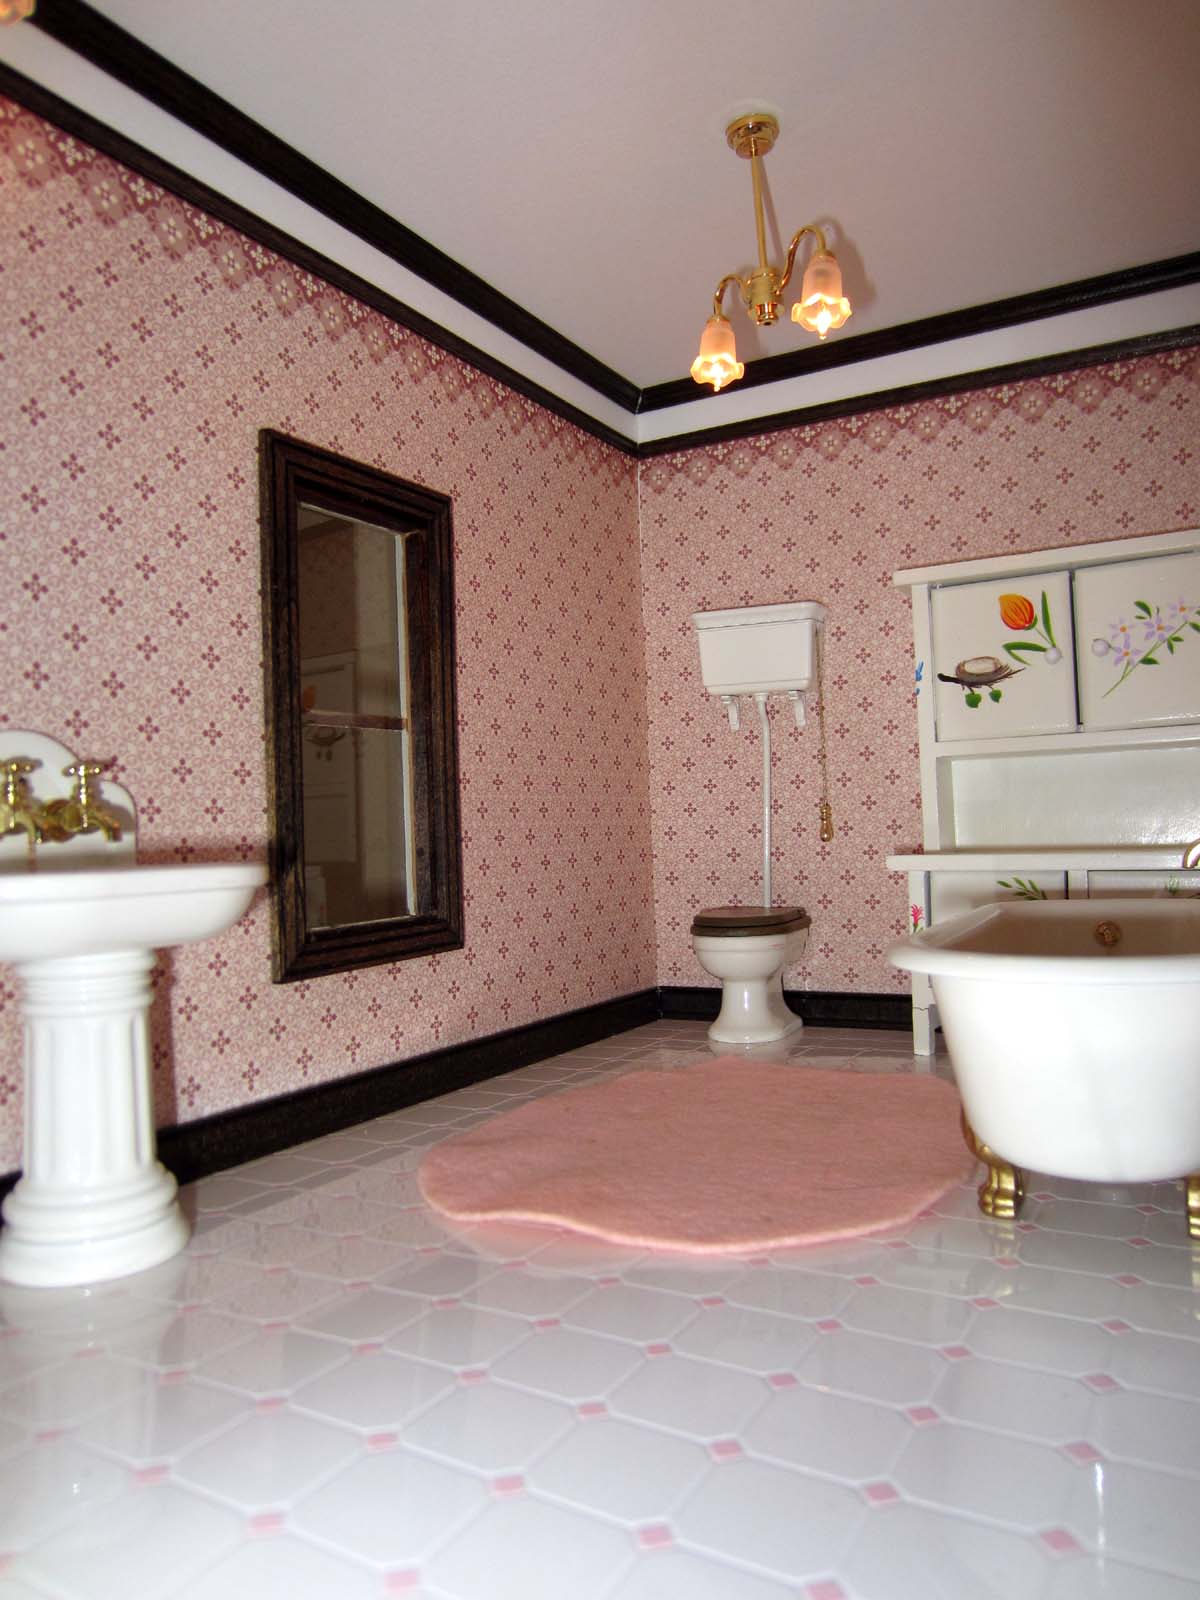
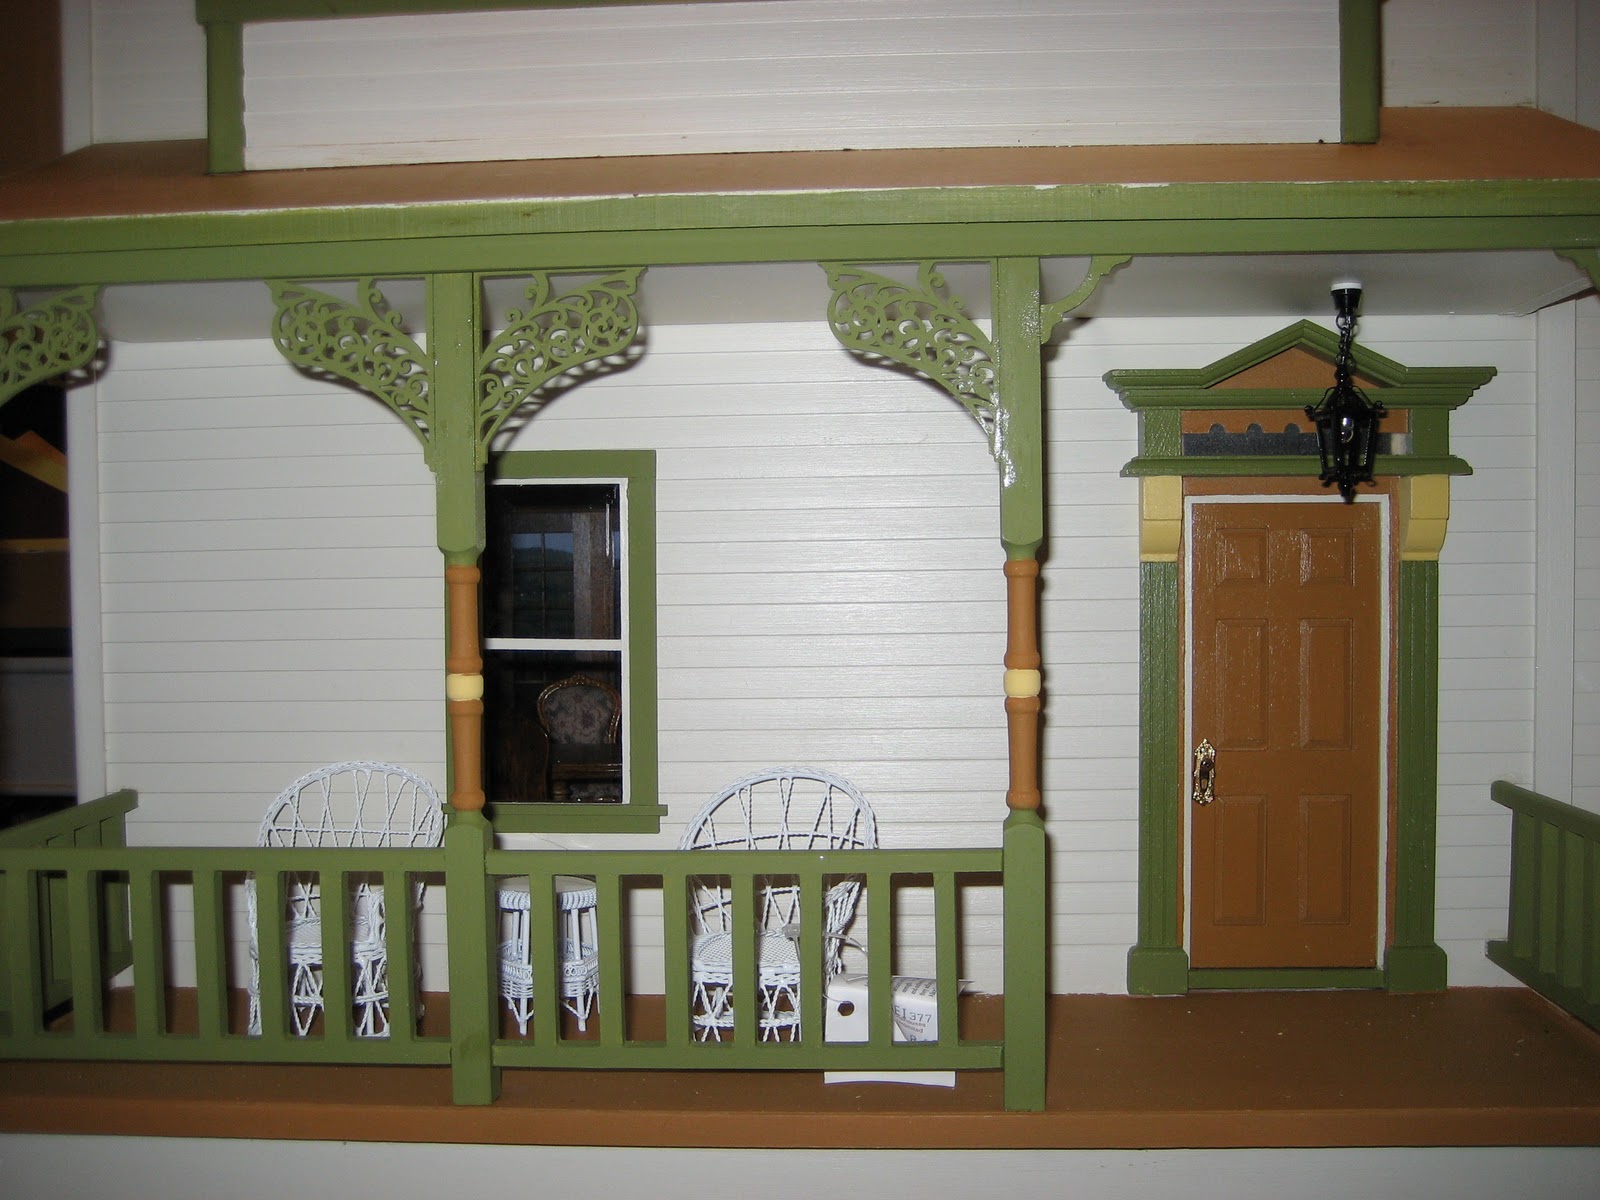
Anyway, the ground floor and second floor now have wallpaper on 3 sides, ceilings, floors, electricity, and trim. I'll have to do the same to the interior side of the front doors as well. I have attached the front doors to the building proper...twice....and added electricity for the porch lights....and now, the electrical works perfectly until I close the front doors....which coincidentally is the only time you will see the porch lights. Heavy sigh...........
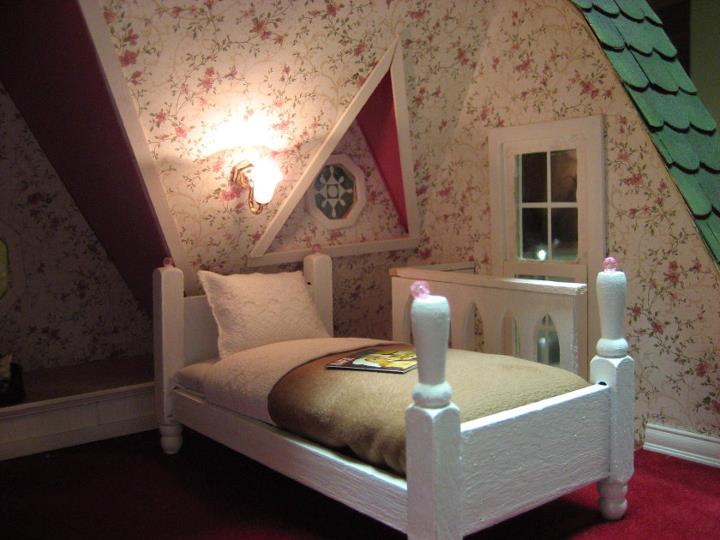
I still have two windows to "trim out" on the inside second floor, but I couldn't stand it any longer. I put all of my furniture in the house just to see how it looks. It is a lot more inspiring than looking at an empty room too long. I also noticed that some of my items may not fit in the floor spaces that I have. Of course, I will have the 3rd floor to work with later when I finish it....


So, this project is a lesson in building, decorating, planning, budgeting, and patience.

Wednesday, November 9, 2011

Some pictures of my progress, or lack thereof, depending on how you see it...

Formal Parlor view

Bedroom with hand painted ceiling sans light fixture...and window trim... and door...

Beginnings of bathroom

Working on the bathroom floor

Kitchen bare....

Windows...

Monday, October 31, 2011

Electrifying!

Wiring anything can be daunting if you're not an electrician, which I am not.  As usual, I search and research until I find a suitable article to help me understand.  There is an excellent "how to" on the net including greenleafminiatures.com site and cirkitconcepts.com.
I decided to use "hybrid" wiring for my house.  It combines the "round wire" and the "flat wire" with connections secured by brass brads that are the size of mosquitos (well, little mosquitos).   The goal is to have plenty of light in your house without showing the wires.
I started by round wiring under the house (entering from the plug through the foundation) and coming into the house at the back wall and connecting to flat wire that spreads in both directions.  I also came up through the floor with round wire by the stairway .so I can run a flat wire around the bottom of the interior wall.  I plan to add an electrical outlet on that wall for a lamp later on. All of the first floor ceiling lights will be run under the second story floors but they are tied into the main electric at the back wall. This will necessitate installing the floors upstairs with a subfloor, but it will be worth it if I need to work on or change those lights out later.The chimney breast and fireplace will cover all the connections and if I work it right, I'll be able to open the chimney breast like a door should I need to repair any electrical connections later on. The rest of the flat wire will be covered with wallpaper.
Electrifying

Friday, October 28, 2011

Planning and Doing........

Okay, I've read the assembly instructions multiple times, I've sealed and sanded each piece, and I'm still nervous about commiting to the assembly. I finally decide that I can go ahead and assemble the base. It's basically a rectangle that has crossbraces running between the sides in kind of a W fashion. I glue, I square, I adjust, I clamp, I square again, I glue again, I use the brad gun, I hammer, I square again, OMG! I've built human size outbuildings easier than this! I managed to get it square (as evidenced by it lining up with the floor base that appears to have squared corners). I leave it to dry...
Tick, tick, tick....
Trying to get a feel for how everything fits..
Next day - The base seems to be pretty solid so on to the next step. Before I add my flooring, I need to start wiring the first level because I want it all hidden and under the floor is an excellent place to hide it. Basically I'll have hybrid wiring with wiring from the transformer and flat tape running down each wall and through the interior doors. I will then run tape from the upstairs walls over the 2nd level floor to supply the ceiling lights for the 1st level. Just a small hole drilled through the 2nd level to the ceiling of the 1st level.  The most difficult thing about dollhouse wiring (to me) is handling the tiny tiny brass nails that are used to splice the wires.  After that, it's all gravy.

It's time to add the flooring on the 1st level. My plan is to have (from left to right) dining room, formal parlor, kitchen. I'd love to have the kitchen next to the dining room but since the front door opens to the staircase in the middle and I don't want to walk in to the kitchen and I do want to add a fake wall with french doors in the back the dining room...this the way it has to be. I temporarily add the room dividers and arrange the furniture I have. I need to see how much floor space to give each room.  That done, I mark the floors, ceiling, and back wall with pencil so that I can remember where they go.  I can then glue my hardwood floors down. I used Houseworks Dark Walnut in the dining room and formal parlor. After multiple sandings and gloss sprayings (word?) they look like plastic. Crap! I was going for glass.  Later I read that satin finish works better in a dollhouse. Lesson learned, but I think I'll move on..  I opted for the Hobby Lobby Mayberry Oak in the kitchen. I sanded down the kitchen floor to make it smoother and thinner.  It sands nicely, so nicely that when I paint it, the individual boards disappear.   I paint it white, then gray, then streak it, antique it, I tweak, okay I'll stop. I then decide to stencil it with red stencil paint. I've had some for about 10 years, I need to use it anyway. Stencil is perfect!!   Wrong.... after 24 hours the paint is still not dry.  I immediately set about getting that paint off. Of course, it leaves a red stain. So, sanding down to the grain, I apply Golden Oak Danish Rubbing Oil. Done, don't touch it! 


Thursday, October 27, 2011

The Cottage

Here's my experimental house from Hobby Lobby that I referred to in a previous post.  It's the $29 house from Greenleaf that they call "The Orchid".  Very thin, less than optimal quality wood and cuts. But, it's do-able.  I was pretty pleased with the project and got to use a lot of my old inexpensive furnishings from 20-25 years ago. Fun project to prepare me for the big house....

The Cottage pre landscaping. You can't see it very well, but I hand painted the roof shingles after I put each one on seperately. I wanted to make the roof look kind of old and stained by the weather.

The Living Room - I made the couch out of an old leather purse, the table out of an old broken table and 2 spindles and the other stuff is from my old stash....

I love tiny things!

I bought a miniature bare light bulb, painted it red with nail polish, and installed it in an old cheap fireplace that I painted white....

These are my original kitchen appliances from years ago. I repainted them white, with faux granite on the sink top, and put on new cabinet knobs. The rug was needlepoint years ago.


I made the pie recently with polymer clay. It's a cherry pie! I also installed a light in the refrigerator. I wanted to have a man drinking milk from the jug with the fridge door open...wonder where I got that idea... 

The bed was cut down from a full to a twin years ago. I recently painted it white and made some new linens for it. The dresser and accessories are a recent aquisition from Ebay. I love it!


I made the magazine for the bed...photoshop, etc.

The bathroom. Again, recycled fixtures. They had yellowed stickers of roses on them, so I just scrubbed and bleached them...good as new!